My Family

My Family
Showing posts with label Recipes. Show all posts

Wednesday, November 4, 2009

Meatloaf and Microwave Potatoes

Here is my second family recipe (I'm trying new recipes for a cookbook I'm making) - I made my Aunt Anna's Meatloaf. Now, what you probably need to know is... I've never made meatloaf for my family. Seriously. When I said I was making meatloaf, my kids were, like, "What's that?". My husband said that the meatloaf he's had has always been dry. So, NOT ENTHUSIASTIC, is pretty much how everyone felt. But, I trust my Aunt's recipe so, here it is...

Meatloaf by Annemarie Anderson

2 lbs. ground beef
3/4 cup rolled oats
1/4 cup chopped onions
1 1/2 t. salt
1/4 t. pepper
1 beaten egg
3/4 cup milk
(I added about 2 T. Worcestershire sauce too)

Mix all together and put in a loaf pan.

Sauce
1/3 cup catsup
2 T. brown sugar
1 T. prepared mustard


Pour sauce over the top of meat and bake for 1 hour at 350 degrees.

For side dishes, we cooked frozen peas, and I tried a recipe for potatoes - from my Grandma Evans:

Slice potatoes (I used red potatoes). Put in a bowl (I used a pie dish). Top with mushroom soup mix and sliced onions. Add a small amount of water. Top with cheese. Cook in the microwave until vegetables are tender. I had to adapt this recipe a little - I ended up layering all of the above until the dish was full. They turned out kind of like Au Grautin Potatoes. Mmmmm... yummy.

I have to say, this dinner was GREAT! My family raved about it. The meat was soooo tender, the potatoes very tasty, and the peas were... peas. The only thing a few of them didn't like was the sauce - but I thought it was yummy. Here's the finished plate of food...


So, now you've got my Aunt's meatloaf recipe, and my grandmother's potato recipe. Don't say that you've got nothing to cook for dinner!

Tuesday, October 27, 2009

My Great-Grandma Anderson's Apple Sauce Cake Recipe...

So, for Christmas, I've decided to make a book of my Grandma Anderson's recipes (including a bunch of family favorites from as far back as my great-grandmother - maybe even farther). To make it a really cool book, I'm going to make some of the recipes and photograph them for the book. Today, I made the first one - Apple Sauce Cake, from the kitchen of my Great-Grandma Anderson. (I feel kind of like Julie from the "Julie and Julia" movie. Except that my Grandma isn't quite Julia Child (the only difference is that she didn't cook French food! She is every bit as good of a cook! Oh, and much prettier, too!) See?

Exhibit A - Julia Child

Exhibit B - Georgina Anderson (my grandma)

And I'm most definitely NOT going to cook over 500 recipes in a year. Just one, here and there.)

So, without stalling one more second... here are the ingredients...

See that green bowl? Yep, I decided that to make this authentic, I couldn't use my mixer. I did everything by hand. Except the applesauce. I'm sure Great-Grandma made her own applesauce, too! Here is the recipe...

2 cups cake flour (I think that's just all-purpose flour - that's what I used)
1 1/2 t. baking powder
1/2 t. baking soda
1/2 t. salt
1/2 t. cinnamon (or more)
1/2 cup raisins (my kids don't like raisins, and I had a TON of apples that needed to be used, so I peeled, cored, and diced 3 small apples to use in place of raisins)
1/2 t. vanilla (straight from Mexico, OF COURSE)
1/2 cup butter
3/4 cup sugar
1 egg - beaten
1 cup applesauce, slightly sweetened

In a large bowl, cream butter and sugar together. Add the beaten egg and vanilla. In a different bowl, add soda to the applesauce and stir until foamy (my never did go foamy. Oh well.) Add to the butter/sugar mixture. Sift dry ingredients together and add to the wet ingredients. Add raisins, or in our case apples, and nuts (if desired). We used chopped up candied pecans. Bake in a greased and floured 8x8 pan, at 350 degrees, for 45 minutes, or until knife stuck in the middle of cake comes out clean.

Enjoy...

Oh, man, this was soooooo good. Very moist, and just look at those chunks of apples, straight from my inlaws' tree. *Sigh*


Monday, October 12, 2009

October is PLUM month!

October for me means it's time for plum jam!!! My inlaws have these incredible Italian plum trees, and I love the jam that comes from that fruit. So, with the help of my sister, Kris, I just finished making 156 containers of plum freezer jam, 30 pints of cooked jam, and 30 half pints of cooked jam. Some dried plums, and a few nights ago I made a heavenly dessert - Plum Crisp.

Anyone can enjoy plum jam - you just need the recipe and some instructions, right? So I thought that I'd provide that for you. Here goes...

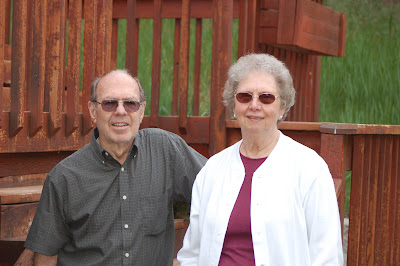
STEP 1 - marry this guy...

so that these two wonderful people are your inlaws, and you can pick plums from their trees...
OR...

STEP 1 - If that isn't possible, either beg me for some plums (sorry - this years are all gone), or go and buy some at the store. This is what they should look like... (sorry about the blurry pictures, darn it!)


STEP 2 - Wash either freezer jam containers, or jars and rings.

STEP 3 - You'll need the following... Light corn syrup, sugar, lemon juice, and MCP pectin (not SureJell). You'll find the recipes for either freezer jam or canned jam in the MCP box - look for the Sweet Plum recipes.


STEP 4 - Wash the plums, cut them in half, and take the pits out...


STEP 5 - put the plums in a food processor and cut up. I don't like pieces of fruit in my jam, so I blend them quite a bit.

STEP 6 - For freezer jam, combine fruit and lemon juice. Mix in the pectin - let sit for 30 minutes, stirring every 5 minutes. Mix in the corn syrup, and then the sugar. Stir until the sugar dissolves. Pour into freezer jam containers. Let them sit on your counter for 24 hours, and then put them into the freezer. Freezer jam is my favorite kind of jam - it tastes so fresh and yummy. I really love it.

STEP 6 - For canned jam, combine fruit and lemon juice in a large pot on the stove. Stir in the pectin and turn up heat - stirring until the mixture comes to a boil. Add the sugar (you don't need corn syrup with this kind of jam), and mix well. Continue stirring until the mixture comes to a ROLLING BOIL. Once it's at the boiling stage, set a timer for 4 minutes and stir constantly.


STEP 7 - When the timer goes off, skim the foam off of the top into a container (this is one of the best parts of plum jam - combine this with cream cheese for a heavenly fruit dip!)
STEP 8 - Pour jam into jars and put lids on (make sure you've boiled the lids first and they are HOT).

STEP 9 - Put the jars into a HUGE pot and give them a "bath" - look on pectin instructions to see how long you need to boil them.

STEP 10 - ENJOY!!

The plum jam on the left is freezer jam for my son Alex's Eagle Project (yes, you can buy some!), the stuff in the middle in for ME, and the stuff on the right in the smaller jars is the jam for Christmas gifts. It is SO satisfying, after a long day canning food (long, as in 11 hours!), to see a counter full of finished jam. Oh, and this is only about a 1/3 of the jam my sister, Kris, and I made. Kris also canned whole plums in sugar water, and we both dried some plums.

We are plum tuckered out!

If you are one of my friends or neighbors - you get Plum Jam for Christmas ! YAY!!!

Blog Widget by LinkWithin

My Gorgeous Boys

My Gorgeous Boys